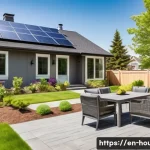
Have you ever found yourself dreaming of unlocking your property’s full potential, perhaps by adding a cozy accessory dwelling unit (ADU) or embarking on a small-scale urban infill project?
In today’s dynamic housing market, with affordability challenges and a growing desire for sustainable, multi-generational living, optimizing your existing space has become a hot topic.
It’s a fantastic way to boost property value, create passive income, or even provide a comfortable home for family members. I’ve personally seen the incredible transformations these projects can bring, not just to a property but to an entire neighborhood’s vibrancy.
However, I also know firsthand how quickly that initial excitement can turn into overwhelm when faced with a maze of local regulations, permits, and construction complexities.
It truly feels like navigating a dense forest without a map sometimes! But what if I told you there’s a clear path to follow, even amidst all the jargon and red tape?
Understanding the precise steps involved is key to transforming your vision into a profitable reality without unnecessary stress or costly delays. Let’s delve into the exact procedures you’ll need to know to make your small-scale housing development a resounding success.
Initial Vision & Feasibility Check

Okay, so you’ve got this incredible idea brewing – maybe it’s that backyard ADU you’ve always dreamed of, or perhaps you’re eyeing a duplex conversion that could double your income potential. That initial spark is thrilling, isn’t it? But before you dive headfirst into blueprints and contractor quotes, pause for a moment. This first stage, the vision and feasibility check, is where you lay the groundwork for everything else. I’ve seen so many projects get derailed because folks skipped this crucial step, jumping ahead without truly understanding what their property can handle or what they truly want to achieve. It’s like trying to bake a cake without knowing if you have all the ingredients! Trust me, a little introspection and research now will save you a world of headaches (and money) later. This isn’t just about what you *can* build; it’s about what makes the most sense for *your* goals and *your* specific piece of land.
Defining Your “Why” and Property Potential
First off, let’s get crystal clear on your ‘why.’ Are you looking to generate rental income, create a multi-generational living space, boost your property value for a future sale, or perhaps a combination? Each goal will subtly shift your approach to design, budget, and even the type of unit you pursue. Once you’re clear on that, it’s time to really look at your property. I mean, *really* look. What are its natural advantages? Is there a flat, easily accessible backyard for an ADU? Do you have an existing basement with good ceiling height that could be converted? What about existing utility lines – water, sewer, electrical? These seem like small details, but they can significantly impact your construction costs and timelines. I remember one client who was convinced they could build a basement apartment, only to discover their sewer line was uphill from the proposed unit, necessitating a costly pump system. These are the kinds of revelations you want *before* you’ve invested heavily in architectural plans. Understanding your property’s inherent potential and limitations from the get-go is non-negotiable for a smooth journey.
The All-Important Site Assessment
Once you have a clearer vision, the next step is a more formal site assessment. This isn’t just about looking at your yard; it’s about understanding the land itself. Think about things like soil conditions – certain soil types can require more complex and expensive foundations. What about drainage? You definitely don’t want your new unit to become a swimming pool during heavy rain! Tree coverage is another big one; healthy, mature trees can be gorgeous but also expensive to work around or remove if they’re in the way of your build. I’ve personally learned the hard way that a detailed topographical survey, even for a small project, can be an absolute lifesaver. It maps out elevations, existing structures, easements, and utility locations with precision. Without it, you’re essentially guessing, and guessing in construction often leads to expensive mistakes. For instance, knowing exactly where an underground power line runs before you start digging can prevent a very dangerous and costly accident. This step truly sets the stage for a realistic design and budget.
Demystifying Local Zoning and Permits
Now, this is often where the initial excitement can turn into a bit of a headache for many homeowners. Believe me, I’ve been there, staring at dense municipal code documents, feeling like I needed a law degree just to understand if I could put a shed in my backyard, let alone a whole new living unit! But here’s the secret: it’s not as impenetrable as it seems, and actually, local zoning and permitting are your friends. They’re there to ensure safety, maintain neighborhood character, and prevent haphazard development. The trick is to learn how to navigate them. Every city, county, and even neighborhood can have slightly different rules, and what applies in one jurisdiction might be completely different just a few miles down the road. This stage often feels like the slowest, but a thorough understanding here prevents costly rejections and delays down the line. It’s about being proactive and asking the right questions, rather than waiting for problems to arise.
Decoding Your City’s ADU/Infill Ordinances
Your first port of call should be your local planning department’s website. Many cities have embraced ADUs as a solution to housing shortages, and often have dedicated sections detailing their specific Accessory Dwelling Unit ordinances. Look for information on lot size requirements, setbacks (how far your building needs to be from property lines), maximum heights, allowable unit sizes, parking requirements, and owner-occupancy rules. Some areas might even dictate architectural styles or materials to ensure consistency with the existing neighborhood. It’s crucial to distinguish between what’s *allowed by right* and what might require a *conditional use permit* or a *variance*, which can add layers of complexity and time. For example, in my city, a detached ADU under a certain size can often be built “by right” with straightforward permits, but if you want to convert a garage and go slightly over the allowed square footage, suddenly you’re in a different category requiring a public hearing. These nuances are vital, so don’t just skim – really dig into the details or, better yet, print them out and highlight the sections relevant to your project.
Pre-Application Meetings: Your Secret Weapon
If you take one piece of advice from me on this entire journey, make it this: schedule a pre-application meeting with your local planning department. This is an informal, yet incredibly valuable, opportunity to sit down with a city planner (or sometimes an entire team, depending on your project’s scope) and discuss your plans before you’ve committed too much time and money. Bring a sketch, a survey, and a list of questions. They can tell you straight away if your idea is feasible, point out potential roadblocks you hadn’t considered, and clarify any confusing ordinances. I’ve personally found these meetings to be invaluable. They often offer insights that aren’t explicitly written in the code books, like common interpretations or specific department preferences. It’s also a chance to build a relationship with the people who will eventually review your formal application. They can often guide you on the specific documents you’ll need and the general timeline you can expect. Think of it as getting a sneak peek at the exam questions before the big test.
Common Permitting Pitfalls to Avoid
Even with the best preparation, permitting can feel like a minefield. One common pitfall I’ve seen is incomplete applications. Missing one small document or a signature can send your entire application back to the bottom of the pile, costing weeks or even months. Another big one is not understanding the difference between planning approval and building permits. You might get the green light for your concept from planning, but then building code compliance (structural, electrical, plumbing, fire safety) is a whole separate beast that requires detailed engineering. Don’t assume one covers the other. Also, be aware of impact fees; many jurisdictions charge fees for new construction to cover the strain on public services like water and schools. These can sometimes be substantial and need to be factored into your budget upfront. Finally, always document everything: every conversation, every email, every revision. This paper trail can be incredibly helpful if disputes arise or if you need to refer back to specific advice given by city staff. Patience and meticulousness are your best friends here.
Crafting Your Design and Securing Approvals
Once you’ve wrestled with the zoning codes and had those crucial pre-application meetings, the next exciting phase truly begins: bringing your vision to life through design. This isn’t just about making something look pretty; it’s about creating a functional, compliant, and ultimately profitable space. It’s where the abstract rules start to take tangible form, and it’s also where you’ll make some of the biggest decisions that impact your budget and the long-term livability of your unit. I’ve always found this part to be incredibly rewarding, seeing those initial sketches transform into detailed architectural drawings. But it’s also a stage that requires a delicate balance between your aesthetic desires and the practical realities of construction and regulation. Getting it right here saves you so much grief further down the line, trust me. You want a design that excites you but also sails smoothly through the approval process.
Working with Architects and Designers
Unless you’re a seasoned architect yourself, engaging a professional designer is almost always a wise investment for small-scale developments. They understand building codes, local regulations, and can translate your ideas into detailed drawings that the city and contractors can understand. A good architect doesn’t just draw lines; they optimize space, consider natural light, suggest cost-saving materials, and can often spot design flaws before they become expensive construction problems. I’ve worked with designers who not only created beautiful, functional layouts but also helped navigate tricky zoning interpretations thanks to their existing relationships with city planners. When choosing one, look for someone with experience in ADUs or similar small-scale residential projects in your area. Ask to see their portfolio and, crucially, check references. A great architect or designer can truly be your advocate and guide through this complex process, ensuring your plans are not just aesthetically pleasing, but also fully compliant and buildable. Don’t be afraid to clearly communicate your budget and expectations from day one – transparency is key.
The Approval Process: From Plans to Permits
With your detailed architectural and engineering plans in hand, it’s time to formally submit for your building permits. This typically involves submitting multiple sets of drawings, structural calculations, energy efficiency reports, and sometimes even landscape plans. Each department – planning, building, fire, public works – will review your submission, often simultaneously, looking for compliance with their specific codes. This stage can involve back-and-forth communication, where reviewers request revisions or clarifications. It’s called “plan check,” and it’s a completely normal part of the process. Don’t get discouraged if you receive comments; it simply means they want more information to ensure your project is safe and compliant. My advice? Address comments promptly and thoroughly. The faster and more accurately you respond, the quicker your plans move through the queue. It requires patience, but remember that each revision brings you closer to that coveted permit in hand.
Neighborly Relations and Community Input
While not always a formal requirement, fostering good neighborly relations can make a significant difference in the approval process, especially if your project requires any variances or public hearings. Nobody wants to deal with angry neighbors showing up at a planning meeting, armed with complaints. I’ve found that a little proactive communication goes a long way. Before submitting your plans, consider talking to your immediate neighbors, showing them your proposed design, and addressing any concerns they might have about privacy, parking, or construction noise. Transparency can often diffuse potential opposition before it even starts. Of course, you don’t need to ask for permission, but informing them demonstrates respect and can turn potential adversaries into allies or at least neutral parties. Sometimes, city ordinances even require public notification or comment periods, making neighborly input a formal part of the process. Being a good steward of your community is always a win-win.
Navigating Financing and Budgeting
Alright, let’s talk numbers, because let’s be honest, even the most beautifully designed ADU or infill project won’t get off the ground without solid financial planning. This stage can feel daunting, but it’s where you turn your dreams into a realistic financial model. I’ve seen too many homeowners underestimate the costs, leading to stalled projects or massive stress halfway through. My personal philosophy? Always, always, *always* overestimate your budget and build in a healthy contingency fund. Construction rarely goes exactly as planned, and unexpected issues *will* pop up. Whether it’s unforeseen soil conditions, supply chain delays, or a surprise permit fee, having that financial buffer is like having an insurance policy for your peace of mind. Getting a clear handle on your financing options and setting a detailed budget from the outset is absolutely critical for the success and sustainability of your project.
Exploring Funding Options for Small Developments
For most of us, self-funding an ADU isn’t an option, so exploring various financing avenues becomes a key task. You’ve got a few main routes here. A popular one is a home equity loan or a home equity line of credit (HELOC), which leverages the equity you’ve already built in your primary residence. These often come with favorable interest rates. Another common choice is a construction loan, which is specifically designed for building projects; funds are typically disbursed in stages as construction milestones are met. Some areas even offer specific ADU loan programs, sometimes through local governments or credit unions, designed to incentivize affordable housing. Don’t forget about personal loans for smaller projects, although these usually have higher interest rates. I once helped a friend secure a combination of a HELOC and a personal loan to get his garage conversion off the ground, strategically using the HELOC for the larger structural work and the personal loan for finishes. The key is to shop around, compare rates and terms, and understand the repayment schedule for each option. Don’t just jump at the first offer you receive; due diligence here pays off massively.
Realistic Budgeting and Contingency Planning

Creating a truly realistic budget goes beyond just getting a few contractor quotes. You need to break down every single component of the project. This includes not just materials and labor, but also soft costs like architectural and engineering fees, permit fees, surveys, impact fees (which can sometimes be substantial!), utility hookup fees, and even temporary housing or storage if your primary residence will be affected. Then, add in those less obvious costs: site prep (demolition, excavation), landscaping around the new unit, appliances, window treatments, and even interest payments on your loan during the construction period. I cannot stress enough the importance of a contingency fund. For small-scale housing projects, I typically recommend setting aside at least 15-20% of your total estimated project cost for unexpected expenses. If you don’t use it, fantastic! But if you need it, you’ll be incredibly grateful it’s there. Running out of funds mid-project is a nightmare scenario that can lead to significant delays and added costs, so plan for the unexpected.
Finding the Right Build Team
Once your plans are approved and your financing is lined up, the rubber really meets the road: it’s time to find the people who will actually build your vision. This is arguably one of the most critical stages, because even the most brilliant plans can fall apart with the wrong builder. I’ve personally learned that trusting your gut is important, but it needs to be backed up by solid research and clear communication. You’re not just hiring someone to swing a hammer; you’re bringing on a partner who will be navigating complex logistics, managing subcontractors, and ultimately bringing your significant investment to life. A good general contractor can make the entire process feel smooth and manageable, while a bad one can turn it into a relentless source of stress and unforeseen expenses. Take your time with this decision; it’s an investment in your peace of mind as much as it is in your property.
Vetting Contractors: More Than Just a Quote
Getting multiple bids is standard practice, but don’t let price be your sole deciding factor. A significantly lower bid might signal corners being cut or an incomplete understanding of the project scope. When vetting contractors, look for several key things. First, ensure they are properly licensed and insured in your state or province. Ask for proof! Second, check their references—and actually call them. Ask past clients about their communication style, problem-solving abilities, adherence to budget and timeline, and overall satisfaction. Did they clean up the site regularly? How did they handle unexpected issues? Third, ask to see examples of similar projects they’ve completed. Does their quality of work align with your expectations? Finally, pay close attention to the contract. It should be detailed, outlining everything from payment schedules and materials specifications to timelines and change order procedures. I learned the hard way that a vague contract is an open invitation for misunderstandings and disputes. A reputable contractor will be transparent and happy to walk you through every line item.
Project Management: Staying on Track
Even with a fantastic contractor, staying engaged in the project management is crucial. While your general contractor will oversee the day-to-day, you’re still the homeowner and the ultimate decision-maker. Establish clear lines of communication from the outset. How often will you meet? What’s the preferred method of contact? Weekly check-ins on site can be incredibly effective for reviewing progress, addressing concerns, and making timely decisions. Be prepared for change orders; these are inevitable in construction. However, ensure every change, no matter how small, is documented in writing and signed off by both parties, clearly stating the cost and timeline impact. This protects everyone involved. I’ve found that visiting the site regularly (but not excessively, you don’t want to micromanage!) helps you catch potential issues early and keeps you informed. Remember, you’re part of the team, and proactive involvement ensures your vision is executed precisely as intended.
Overcoming Construction Hurdles
Okay, so the permits are in hand, the financing is secured, and your awesome build team is ready to break ground. This is where the physical transformation really begins, and it’s incredibly exciting! But let’s be realistic: construction is rarely a perfectly smooth, linear process. There will be bumps, detours, and unexpected challenges. I’ve had everything from hidden underground pipes requiring rerouting to supply chain delays causing weeks of waiting for a specific type of window. It’s just part of the game. The key to successfully navigating these hurdles isn’t avoiding them entirely (because you can’t), but being prepared for them, staying calm, and maintaining clear communication with your contractor. Think of it as a marathon, not a sprint; there will be difficult stretches, but with resilience and good planning, you’ll cross the finish line with a fantastic new space.
Managing Unexpected Delays and Costs
I mentioned the contingency fund earlier, and this is exactly where it earns its keep. Delays can come from a myriad of sources: bad weather, unexpected site conditions (like discovering old foundations or contaminated soil), delays in inspections, or shortages of specific materials or skilled labor. Each delay often translates directly into increased costs, whether it’s extended equipment rentals, additional labor hours, or even just the carrying costs of your loan. My best advice here is proactive communication. Your contractor should be informing you immediately of any potential delays or cost overruns. Don’t wait until a week after something was supposed to happen to ask why it hasn’t. Similarly, if you’re the one making a decision that impacts the schedule or budget, communicate that promptly. Being flexible and pragmatic is vital. Sometimes, a slight design modification or a material substitution can alleviate a significant delay or cost increase, and an experienced contractor will often have creative solutions to propose. It’s all about working together to minimize the impact.
Quality Control Throughout the Build
While your contractor is responsible for the quality of the work, you also have a role to play in ensuring your standards are met. This isn’t about micromanaging, but about regular oversight and asking questions. Don’t be afraid to voice concerns if something doesn’t look right or if it deviates from the approved plans. Schedule regular walk-throughs with your contractor to inspect progress and identify any potential issues before they become harder (and more expensive) to fix. Key inspection points include the foundation, framing, plumbing and electrical rough-ins, insulation, and finishes. For instance, I always make sure to check the windows and doors for proper sealing and insulation before they’re fully trimmed out. Also, ensure all required municipal inspections are happening on schedule and passing. These inspections are crucial checkpoints to ensure everything is being built to code. Remember, it’s far easier and less costly to address a problem during construction than after the project is complete and everything is covered up. Trust your instincts and speak up if something seems off.
| Development Type | Typical Use Case | Key Benefits | Common Challenges |
|---|---|---|---|
| Accessory Dwelling Unit (ADU) | Rental income, multi-generational living, home office, guest suite | Increases property value, passive income, flexible space, relatively faster approval in many areas | Zoning restrictions, utility hookups, limited space, neighborhood resistance |
| Duplex Conversion | Increased rental units, owner-occupancy with rental income | Doubles rental income potential, maximizes existing structure, often more cost-effective than new build | Extensive structural/mechanical changes, fire codes, parking requirements, tenant displacement |
| Small-Scale Urban Infill (e.g., Tiny Home on Foundation) | Maximizing underutilized urban lots, affordable housing, unique lifestyle | Efficient use of space, lower carbon footprint, potential for higher density on small parcels | Complex zoning for multiple units on single lot, infrastructure capacity, design constraints |
Marketing Your New Space & Maximizing ROI
So, you’ve done it! The construction dust has settled, the final inspections are passed, and you’re standing in your beautifully completed ADU or infill unit. It’s a huge accomplishment, and you should absolutely take a moment to soak it all in. But the journey isn’t quite over, especially if your primary goal was to generate income or significantly boost your property’s value. Now, the focus shifts to ensuring your hard work translates into tangible financial returns. This is where strategic marketing and a clear understanding of your local market come into play. Just like any product, your new living space needs to be presented in its best light to attract the right tenants or buyers, ensuring you get the optimal return on your significant investment. This final stage is about smart decision-making that solidifies your financial gains.
Renting or Selling: Understanding Your Market
Before you even think about putting up a ‘for rent’ or ‘for sale’ sign, you need to deeply understand your local market. Are rental vacancies high or low in your neighborhood? What are comparable ADUs or small homes renting for? If you’re looking to sell your entire property with the new unit, how much value does it actually add? I always recommend doing thorough research on platforms like Zillow, Trulia, Realtor.com, or local real estate listing sites. Look at properties similar in size, amenities, and location. This will give you a realistic idea of what your property can command. For rentals, consider your target demographic: students, young professionals, small families, or empty nesters? Their needs and preferences will influence how you market the space and what amenities you highlight. My friend, after building his ADU, initially thought he’d attract students, but market research showed a huge demand from traveling nurses. Shifting his marketing strategy paid off immensely.
Strategic Pricing for Optimal Returns
Pricing your new unit isn’t just about picking a number; it’s a strategic decision that directly impacts your ROI. If you price too high, you risk long vacancies, which means lost income. Price too low, and you’re leaving money on the table. For rentals, consider not only the monthly rent but also what’s included (utilities, internet, furnished/unfurnished). Factor in seasonality; rental demand can fluctuate throughout the year. For sales, an appraisal by a certified professional is invaluable, especially one with experience in properties that have ADUs or secondary units. Highlight the unique benefits of your specific unit: perhaps it’s proximity to public transport, energy-efficient features, or a private outdoor space. High-quality photos, and even a virtual tour, are non-negotiable in today’s digital age. Craft compelling descriptions that paint a picture of the lifestyle your new space offers. Remember, a well-marketed and strategically priced unit won’t just attract attention; it will attract the *right* attention, ensuring a quick and profitable transaction.
Wrapping Things Up
Whew! What a journey we’ve covered, right? From that initial spark of an idea to the satisfying moment of renting out your shiny new space, building an ADU or tackling an infill project is a testament to your vision and perseverance. I truly hope that sharing my own experiences and what I’ve seen others go through has given you a clearer roadmap and perhaps a little more confidence to embark on your own venture. Remember, every challenge you overcome just makes that final achievement even sweeter. It’s an investment not just in real estate, but in your financial future and the potential for new opportunities. You’ve got this!
Useful Information to Know
1. Start with “Why”: Before anything else, clearly define your primary motivation. Is it passive income, housing for family, or increasing property value? Your “why” will guide every decision, from design choices to financial strategies, and help you stay focused when the inevitable hurdles pop up. Having a clear objective makes all the complex decisions downstream much simpler and more aligned with your ultimate goals. It’s the foundation of your entire project, literally and figuratively.
2. Befriend Your Planning Department: Seriously, these folks are a goldmine of information. Attending pre-application meetings, asking clarifying questions, and understanding local ordinances *before* you even sketch a blueprint can save you an incredible amount of time, money, and heartache. They’re there to help you navigate the rules, and a good relationship with them can smooth out the permitting process significantly. Don’t view them as gatekeepers, but as guides.
3. Budget for the Unexpected (and Then Some): Construction is full of surprises. Trust me, I’ve seen it all! Always build in a robust contingency fund, at least 15-20% of your estimated project cost, because something *will* come up – unexpected site conditions, material price hikes, or inspection delays. Having this financial buffer isn’t just smart; it’s essential for peace of mind and preventing your project from stalling when faced with unforeseen expenses.
4. Communication is Your Superpower: Whether it’s with your architect, contractor, or even your neighbors, clear and consistent communication is paramount. Establish how and when you’ll get updates, document every decision and change order in writing, and don’t be afraid to ask questions or voice concerns. A proactive approach to communication prevents misunderstandings, keeps the project on track, and ensures everyone is aligned with your vision from start to finish.
5. Leverage Local Expertise: Don’t try to be a lone wolf. Engage professionals who have experience with ADUs or infill developments specifically in your area. This includes architects, engineers, and especially contractors. Their familiarity with local codes, climate conditions, and even the “unwritten rules” of your city can be invaluable. They can offer insights and solutions that you might never consider, ultimately leading to a more efficient, compliant, and successful build.
Key Takeaways
Embarking on a small-scale development project, like building an ADU or converting a duplex, can be incredibly rewarding. Success hinges on a clear vision, thorough due diligence on zoning and permits, a well-defined budget with a significant contingency, and assembling a reliable, experienced build team. Proactive communication and meticulous project oversight are crucial to navigate inevitable construction hurdles. Finally, strategic marketing and accurate market understanding are essential to maximize your return on investment, transforming your hard work into tangible financial benefits.
Frequently Asked Questions (FAQ) 📖
Q: What’s the absolute first step I should take when I’m thinking about adding an
A: DU or starting a small infill project, and how can I avoid getting completely overwhelmed by all the rules? A1: Oh, I totally get that feeling of being a deer in headlights!
When I first dipped my toes into this, the regulations felt like a giant, impenetrable wall. My biggest piece of advice, and something I always tell friends who ask, is to start with a friendly chat with your local planning department.
Seriously, before you even sketch out a single floor plan or dream too big, find out what your city’s specific zoning laws and ADU ordinances are. These can vary wildly, even between neighboring towns!
You’ll want to understand things like setbacks, height restrictions, lot coverage, and parking requirements. I’ve seen so many people get excited about a design, only to find out it’s completely non-compliant.
A quick call or a visit to their website (look for their “planning” or “community development” section) can save you a ton of heartache and wasted time.
Think of it as your secret weapon. They’re often happy to clarify things, and you might even discover some incentives or streamlined processes you didn’t know existed!
It really helps to ground your dreams in reality from the get-go.
Q: This sounds great, but let’s be real – how much does a project like this actually cost, and is it truly a good financial investment in the long run?
A: That’s the million-dollar question, isn’t it? The cost is definitely something everyone focuses on, and for good reason! From my experience, the price tag for an ADU or a small infill can swing dramatically, typically ranging anywhere from $100,000 for a modest conversion or prefab unit to upwards of $400,000 for a custom, ground-up build, especially in pricier urban areas.
It depends on so many factors: size, materials, utility connections, site accessibility, and local labor costs. But here’s the kicker: it can absolutely be a phenomenal financial investment!
I’ve witnessed firsthand how adding an ADU can boost a property’s value by a substantial amount – often more than the cost to build it. Plus, the passive income potential from renting it out?
Game-changing! Imagine having an extra $1,500 to $3,000 (or even more!) coming in each month. That cash flow can help pay down your mortgage, fund your retirement, or simply give you more financial freedom.
Even if you don’t rent it out, using it for family can save you thousands in assisted living or rental costs. It truly pays for itself in multiple ways over time.
Q: Once I’ve got the regulations sorted, what’s the general process for getting permits and actually starting construction? It feels like such a black hole of bureaucracy!
A: Oh, the permit maze! It certainly can feel like a daunting journey, but trust me, there’s a clear path once you know what to expect. After you’ve confirmed your project is compliant with zoning, the next big hurdle is securing the necessary permits.
This usually involves two main types: planning permits and building permits. You’ll typically start with submitting detailed architectural plans to the planning department for review.
This stage can involve design review boards, public hearings, or just an administrative review, depending on your city and project complexity. Once planning approval is in hand (phew!), you’ll move on to the building department for your actual construction permits.
This is where they check for structural integrity, safety, electrical, plumbing, and energy efficiency. My personal tip? Hire a good architect or designer who’s experienced with ADUs in your area – they can navigate this paperwork jungle like a pro.
Once permits are issued, construction can begin! But don’t forget, there will be multiple inspections throughout the building process to ensure everything meets code.
It sounds like a lot, and it can take anywhere from a few months to over a year just for permits, but with a solid team and a bit of patience, you’ll get there.
Seeing that vision rise from the ground? Absolutely worth every moment!